INSTALLATION Smart OBD E5 Diagnostic switch Suzuki

Installation
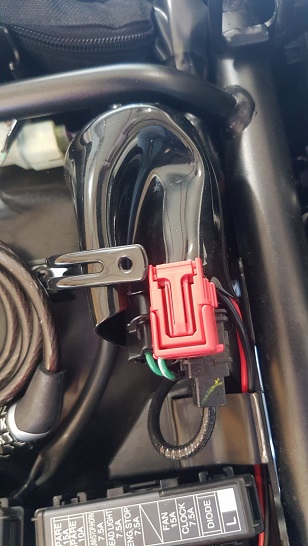
Step 1 : Locate the diagnostics port located under the seat. It is a red 6-Pin
connector and has a red dust cap on it.
Step 2 : Remove the dust cap and connect the Smartmoto Dealer Mode Switch
connector.
Step 3 : Install the waterproof installation kit on the switch body.
Step 4 : Find a suitable place on the motorcycle to secure the switch or install
it through a 6mm hole on a panel using the switch rubber boot to secure it.
DMT-004 DTC
Readout
Step 1 : Start the engine or crank the engine for more
than 4 seconds.
Step 2 : Turn the Dealer Mode Switch ON.
Step 3 : Read the DTC code on the dashboard.
DMT-004 Service Reminder Reset
Step 1 : Turn the ignition switch on.
Step 2 : Press the select switch (up) for about 2 seconds to switch the
screen to "MENU".
Step 3 : Press the select switch (UP or DOWN) to select
"SERVICE".
Step 4 : Turn the Dealer Mode Switch ON and "RESET" appears on
the screen.
Step 5 : By pressing the select switch (DOWN) for about 2 seconds,
"YES" and "NO" appear on the screen.
Step 6 : Press the select switch (UP or DOWN) to select "YES".
Step 7 : Press the select switch (DOWN) for about 2 seconds to select
month, day and distance to setting screen.
Step 8 : Press the select switch (UP or DOWN) to select month, day, distance
and "SET" indication. The selected item is highlighted.
Step 9 : Press the select switch (DOWN) for about 2 seconds to make
arrow marks appear above and below the indication.
Step 10 : Press the select switch (UP or DOWN) to set month, day and
distance indications.
Step 11 : Press the select switch (DOWN) for about 2 seconds. The arrow
marks above and below the indication disappear and the setting is confirmed.
Step 12 : Press the select switch (UP or DOWN) to select
"SET".
Step 13 : Press the select switch (DOWN) for about 2 seconds and the
service reminder setting is confirmed before returning to setting screen in
step 5.
Step 14 : Turn the ignition switch and the Dealer Mode Switch OFF.

